Guides - BioHPC Cloud Storage
What is Cloud Storage?
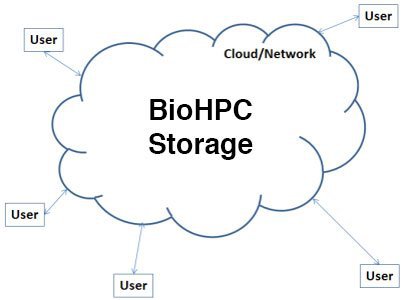
Cloud storage (one of the fundamental components of cloud computing) is a service model in which data is maintained, managed and backed up remotely and made available to users over a network (typically the Internet). You are probably familiar with various consumer cloud storage services, such as Dropbox, Onedrive, iCloud etc. On campus at UTSW you may also know about OneDrive for business. BioHPC has it's own cloud storage service, with it's own strengths.
Why use BioHPC Cloud Storage?
UT Southwestern is that university information must never be stored in unapproved online file storage systems. This includes Dropbox, iCloud and other popular cloud storage systems. The BioHPC cloud is behind the UT Southwestern firewall and thus complies with the policy. You may be aware that the Office 365 OneDrive for Business cloud storage service is also approved for use at UTSW, but it is not ideal for research work - it does not handle large files well, access is slow over the internet, and you cannot directly work with data on OneDrive from BioHPC. The BioHPC cloud services aim to provide large high performance storage spaces, with easy access for a variety of workflows.
What Storage is Available on BioHPC?
File storage on BioHPC can be a little confusing. Because our systems are used by a variety of users, for different types of work, we have a number of different storage systems tailored for different needs. Every user has both cloud storage, and cluster storage. We also make it easy to access your cluster storage via our cloud storage web systems.
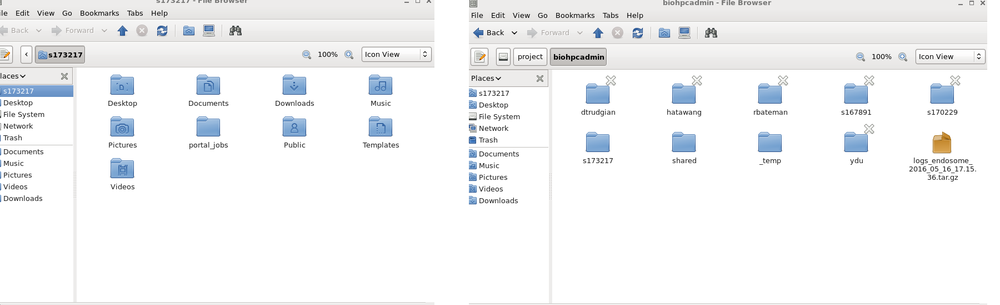
Every standard user has a home2 (/home2/username), project (/project/department/group/username), archive (/archive/department/group/username) and work (/work/department/username) directory. The home2 directory contains a user's configuration files, and other small personal data. The project directory is intended to be the main repository for data that is being processed on the cluster. The work directory is a location for work-in-progress that needs good small-file performance, it is not intended for permanent storage of data. Users working on a workstation, or using a Web Visualization session have direct access to the cluster storage locations within the RedHat 7 GUI interface. This is the fastest and most convenient way to work with your data.
Note - core facility users, granted space by a core facility usually only have space on the /project storage system.
if you're not using a workstation or thin client you can still access your data - both on and off campus via our cloud storage systems. Advanced users can also refer to our , which gives instructions on how to optimize your use of BioHPC cluster storage for best performance.
Cloud Storage
Within the context of BioHPC, the term "cloud storage" refers to the following two websites.
Lamella
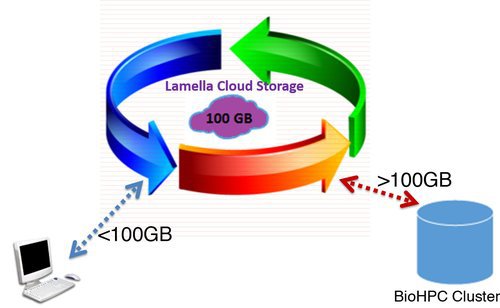
The Lamella website can be accessed via this URL: https://lamella.biohpc.swmed.edu. The Lamella web interface is similar to DropBox and gives you 100GB of separate space within this web interface, as well as a way to access to your cluster storage. Lamella is only accessible within the UTSouthwestern network (or with VPN).
External File Exchange
If you need to share data with someone outside of the UT Southwestern network you can use the external file exchange website: https://cloud.biohpc.swmed.edu. This site has the same web-interface as Lamella, but has a separate storage quota of 50GB.
Summary of Storage Space
| Storage Space | Cluster Storage | Lamella | External File Exchange |
| Use | Home2, Project and Shared Directories |
Internal Cloud | External Cloud |
| Size Limit | Varies | 100GB | 50GB |
How do I access all BioHPC storage spaces from Lamella?
Cluster Storage, Lamella and the External File Exchange are separate spaces, but we can use the lamella web interface to access the other locations. Your home directory is configured to be available automatically, but project and work spaces need to be configured for access.
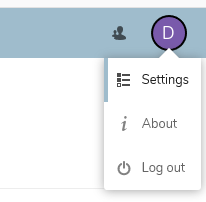
Step 1. Log into Lamella, click on your name in the top right and the choose Settings from the drop down menu.
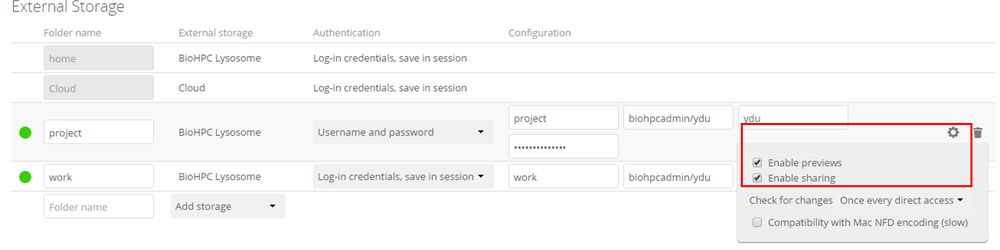
Step 2. On the left pane select the External Storage section. You will see all existing external storages mounted to Lamella. A green circle indicates a succesful connection. You can also mount other BioHPC storages by adding definitions.

Step 3. Mount external storage space to Lamella
External storage accepts two different authentication mechanisms and can be selected from the dropdown menu under Authentication. The Log-in credentials, save in session uses the BioHPC login credentials and only saved in the user session, giving increased security. The drawbacks are that sharing is disabled, as lamella has no access to the cluster storage credentials. The Username and password mechanism requires a manually-defined username and password. Remember to click the gear icon and enable sharing.
Your home directory and BioHPC file exchange (cloud.biohpc.swmed.edu) space are mounted by default with Log-in credentials, save in session mechanism. If you want to mount your BioHPC home directory with Username and password for sharing files with others, or access other BioHPC storage (e.g. project and work), you need add them manually.
Type the desired folder name, pick BioHPC Lysosome for the External storage option,and pick either log-in credential, save in session, or Username and password options for authentication.
Project Directory: Enter project in the Share box and the directory inside project (excluding the first /project) you want to access in the Remote subfolder box. E.g. to access your personal project space at /project/department/lab/s999999 you would enter department/lab/s999999 into the Remote subfolder box. To access your lab shared space you would enter department/lab/shared
Work Directory: Enter work in the Share box and the directory inside work (excluding the first /work) you want to access in the Remote subfolder box. E.g. to access your personal work space at /work/department/s999999 you would enter department/s999999 into the Remote subfolder box. To access your department shared space you would enter department/shared
How can I share files?
You can share files with other users from BioHPC in three ways. 1) sharing with other BioHPC users using shared locations in the /project and /work cluster storage spaces, 2) sharing with any UTSW staff using the lamella web interface, 3) sharing with external collaborators using the cloud file exchange service.
Sharing files on cluster storage
There are several locations on cluster storage to share your files, depending on who you need to share data with. Sharing within your department or lab can be done without any assistance from BioHPC:
- Each lab has a shared directory on /project, e.g. /project/my_department/my_lab/shared that is accessible to everyone in the lab. You can place files here to share them with others in your lab.
- Each department has a shared directory on /project, e.g. /project/my_department/shared that is accessible to everyone in the department. You can place files here to share them with others in your department.
- Each department has a shared directory on /work, e.g. /work/my_department/shared that is accessible to everyone in the department. You can place files here to share them with others in your department.
If you need to share data between departments then BioHPC can setup a location under /project/shared/project_name for you, accessible to a list of users you specify. The space is allocated to one of the departments involved for accounting purposes. Email biohpc-help@utsouthwestern.edu to request these shares.
Sharing files via lamella
The lamella web interface offers a very convenient way to share files with other UTSW users, similar to Dropbox. From the web interface select a file or folder and choose the 'sharing' tab in the right pane of the window. You can:
- Get a 'local link' which is a link to the file that only you can access - this could e.g. be used to refer to a file from an electronic lab book for convenience.
- Share with another BioHPC user by looking them up in the 'Share with users' box.
- Share with anyone on the UTSW network/VPN by sending them a share link, which can be optionally protected with a password and expiration date.
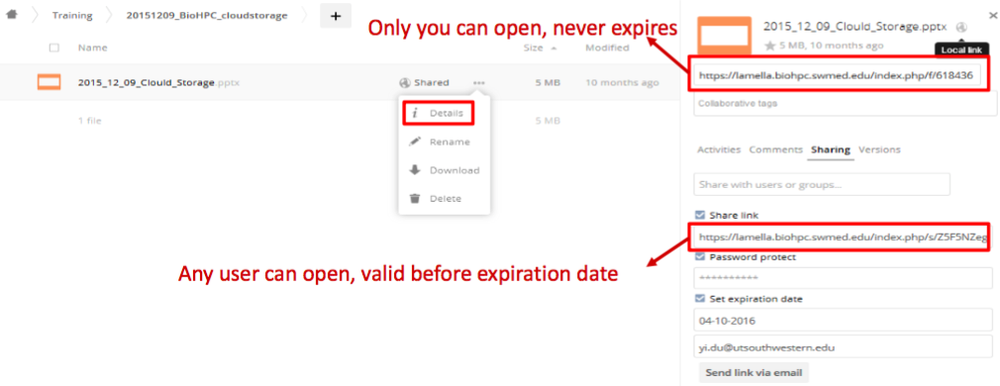
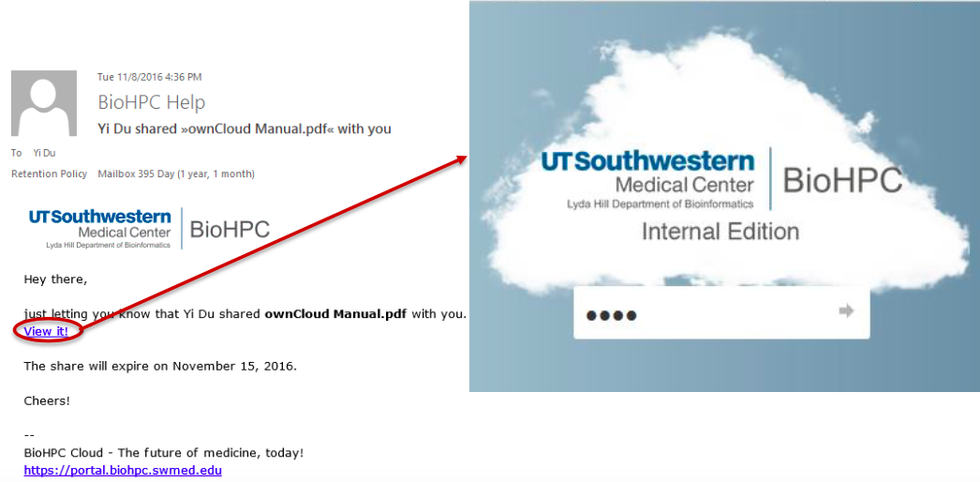
When a user receives a sharing invitation from you it will contain a link, taking them to the file(s), via a login screen if you specified a password:
Sharing files with collaborators
To share files with collaborators you need to add them to your cloud.biohpc.swmed.edu external file exchange space. You can then use the same sharing options that are available on the lamella system, but the share links can be opened by anybody, internal or external to UTSW.
How can I mount cluster storage directories to my PC or Mac?
It's often useful to work on files you have stored on BioHPC from your own laptop or desktop computer. You can mount your home2, project and work space on your PC or Mac to access them directly, just like a local hard disk. This uses samba shares, often known as ‘Network Drives’ on Windows, or ‘SMB shares’ on Mac.
IMPORTANT - If you use symlinks on Linux you should be aware that they behave differently when you mount your storage to Windows or Mac. Because Windows does not have the concept of symlinks, the server follows any symlink present on Linux and provides the actual file over the drive mount, not the link. This means that if you delete a symlink (to a file or folder) from Windows/Mac drive mount it may delete the actual files, not just the link itself.
Windows
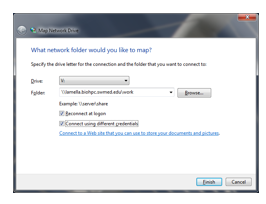
On Windows in the ‘Computer’ file browser you need to click the ‘Map Network Drive’ button on the toolbar.
Pick a drive letter which you want to map your storage as. Enter one of the following addresses to mount home2, project or work space. To mount home2 space you will replace <username>, <department>, <group> with your BioHPC username, department and group names.
\\lamella.biohpc.swmed.edu\<username>
\\lamella.biohpc.swmed.edu\project\<department>\<group>
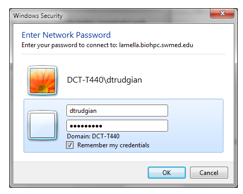
If you login to your PC with a username and password other than your BioHPC account then check the ‘Connect using different credentials’ box. Click ‘Finish’ and you’ll be prompted for a username and password. If the computer is not shared with others you might want to select the option to ‘Remember my credentials’ to avoid being prompted for your password each time you connect.
If your connection is successful the BioHPC space you connected to will open in an explorer window. It will also appear in ‘Computer’ as a drive. You can work with files on the mounted drive in the same way as if they were on a local hard disk. Note, however, that you must be on the campus network or connected to the UTSW VPN to obtain access.
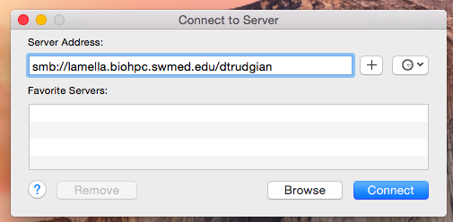
Mac OSX
To mount your BioHPC storage to your Mac open a finder window and then choose ‘Connect to Server’ from the ‘Go’ menu at the top of your screen. Enter one of the server addresses listed and click the ‘Connect’ button. To mount home2 space you will replace <username>, <department>, <group> with your BioHPC username, department and group names
smb://lamella.biohpc.swmed.edu/<username>
smb://lamella.biohpc.swmed.edu/project/<department>/<group>
smb://lamella.biohpc.swmed.edu/work/<department>/<group>
You’ll be prompted to enter your BioHPC username and password, and have the option of saving the password to your keychain if the computer is not shared with others. Click ‘Connect’ and the BioHPC space you mounted will open in a new finder window. You can work directly with files in this space like you would on your local computer.

After a connection is made to lamella from OSX, you’ll find lamella.biohpc.swmed.edu listed in the sidebar of finder windows. For easier access to individual shares you can turn on desktop icons for the mounted drives:
Open a finder window and choose Finder->Preferences from the menu bar.
Check the ‘Connected servers’ checkbox for ‘Show these items on the desktop’.
How can I transfer data with FTP?
Using FTP for data transfer to/from BioHPC storage might be convenient if you have a very large amount of data to move or are working on the command line. FTP can be faster than Windows or Mac mounted shares, but you cannot directly work on files – you must download and upload between your computer and BioHPC.
To connect using FTP we recommend the ‘Filezilla’ client, which can be downloaded at .
Using your FTP client you will need to connect to:
Host/Server: lamella.biohpc.swmed.edu
Port: 21
Use your regular BioHPC username and password for the FTP connection.
* Previous host lysosome.biohpc.swmed.edu continues to work from computers on the campus 10Gb network only. New users should always use lamella.biohpc.swmed.edu
Uploading / Downloading speed
The speed that you experience when uploading or downloading files depends on the service you are using to access the files, and your network connection on campus. 1Gb ethernet connections (most connections on campus) have a maximum of 100MB/s. If you have a 10Gb ethernet connection for your machine you may be able to transfer files more quickly. WiFi connections on campus rarely reach greater than 30MB/s, and can be poor in some areas. We recommend using a wired connection if you are transferring large amounts of data.
| File Transfer |
Max Uploading and Downloading Speed* |
|
Lamella Cloud Storage (Samba) |
400MB/s (10GbE) 100MB/s (1GbE) |
|
Lamella Cloud Storage (FTP ) |
300 MB/s to 1.4 GB/s |
|
BioHPC File-Exchange (webDav) |
10 MB /s |
|
Lamella Cloud Storage (webDav) |
100 MB /s |
How can I sync a local directory with cloud storage?
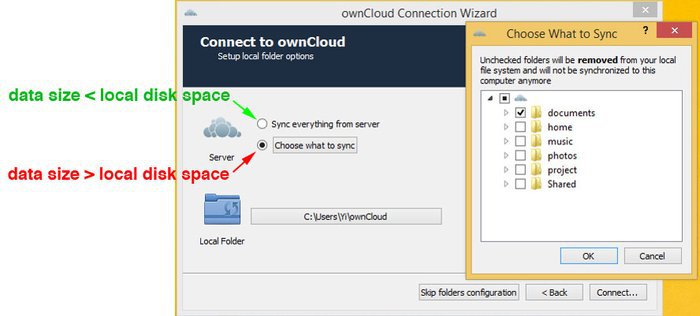
The BioHPC lamella service runs on software called OwnCloud. Owncloud provides a program for Windows, Mac, and Linux which allows you to sync data from your computer to BioHPC, just as you would with Dropbox, OneDrive etc. Before setting up file syncronization estimate the total size of your data. If the total size of data iyou want to sync to BioHPC is always < 100GB you may direct synchronize your data to your lamella cloud space, otherwise configure and use your BioHPC project directory. Also, consider the amount of free space on your local hard drive when setting up sync. You may have many TB of data on BioHPC, and far less space on your laptop or desktop.
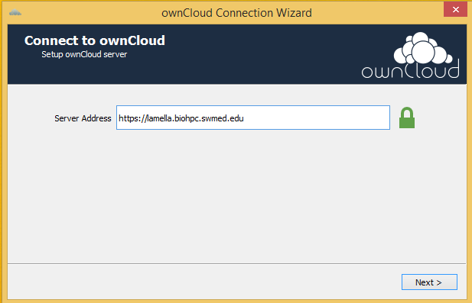
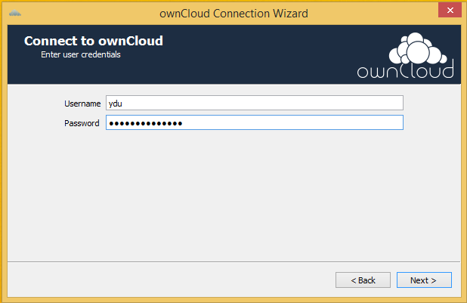
Installing the OwnCloud Client
Download and install the owncloud client from https://portal.biohpc.swmed.edu/content/software/. Then, enter https://lamella.biohpc.swmed.edu as the server address and use your BioHPC credentials.
Choose What To Sync
If you have less space on your desktop/laptop than the size of your BioHPC files then make sure you choose the folders you wish to sync.
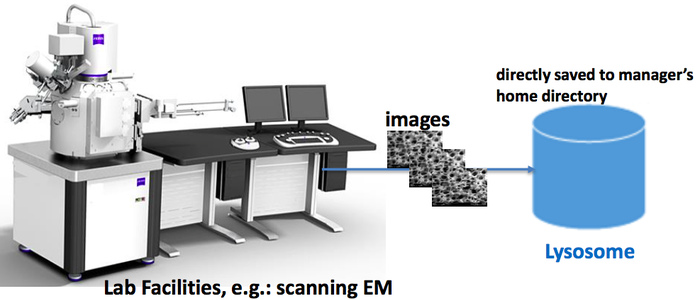
BioHPC Manager Accounts
Many research facilities at UT Southwestern offer shared instrumentation. BioHPC offers manager accounts, where a facility manager can request an account to be used on the instrument computer, for the purpose of transferring data to BioHPC to share with users. The manager account is setup with storage on BioHPC systems, that can be mounted to the instrument computer. Data can then be copied, or directly acquired into BioHPC space. The facility manager can then distribute data to users by sharing it with them via the lamella web interface. This approach permits sharing of data with UTSW users who may not have a BioHPC account. Please contact the BioHPC team if you believe this workflow would be useful for your facility.
Using a BioHPC Manager Account
Step 1. Mount manager's home directory to your lab facility to save data, which support PC, Mac, and Linux/Unix.
Lab manger account: provide storage space under /project/department/group/manager_name (manager's home directory)
Step 2. Share data with non-BioHPC users with a link via the lamella web interface, detailed above.This offers features for security and convenience:
-
password protection (recommended)
-
set up an expiration date (recommended)
-
email notification
Step 3: non-BioHPC users download data by providing password
Backup of BioHPC Storage
BioHPC backs up data from some locations, and requested data from others. Because of the very large size of our filesystems it is not possible to keep a full backup of every piece of data.
Mirror backups, a copy at a point in time (with no older versions available) are taken for:
- /home2 - Twice weekly (Mon & Wed) two copies – home2 usage counts 3x against lab storage allocation
- /work - Weekly (Fri to Sat) one copy – work usage counts 2x against lab storage allocation Excludes some large users
Email the biohpc-help@utsouthwestern.edu ticket system to recover files.
Incremental backups of requested files, keeping older versions up to a specified retention time are kept for:
- /project - Only requested files! – not all of /project. PI needs to request backup or recover files through email biohpc-help@utsouthwestern.edu
- /archive - Only requested files!
By default, incremental backups are run weekly, and we keep 4 weekly and 12 monthly snapshots of files. The space used for the backup is assigned to the department's storage usage. There is self-service recovery of files, which will be explained at setup.
Last updated Dec 2, 2016, YC/DCT.